Pages

Showing posts with label roses. Show all posts

Friday, 11 April 2014

Sewing bits and bobs get organized

Crafty hoarder by nature as I am, I love all sorts of tins, boxes and cases for my crafty stuff. A recent visit to a craft shop in the Daleside garden centre resulted in purchasing this lovely set of 3 metal tins :)


I just love the rose pattern on them. So feminine, so romantic, so ...Tilda or Cath Kidston ;) The labels on them are a nice feature too. They will go nicely with my Cath Kidston mug :)


It's high time to embrace that chaos I've had in my sewing stuff. The turquoise metal tin with roses does not belong to the set. I've had it for a year now, from Aldi ;) It nicely agrees with the overall rose theme


The sewing threads scattered around in various random jars and containers have all been moved into the biggest tin and already filled it up up to the brim.


The oddments of cotton threads I use for cross stitching ended up in the middle-sized box and the pins will live in the smallest pin tin.


From my past magazine subscriptions I've had these two twin wooden boxes :) Tidied them up as well.


One will hold all sorts of needles - sewing needles, tapestry/cross stitching needles, beading needles, crewelwork needles, name it all. Now it's my challenge to remember which box contains which needle type! Usually after a tidy-up, I don't remember where my things are! LOL 


Undoubtedly, I have a weak spot for the cute little tins for bits and bobs :)


The long doll making needles won't fit any any of my needle tins so they will be stored in the box compartments. Although I have never sewn a doll in my life, I came to find them so useful when I was knitting the "julekuler" balls. They will go right through the knitted ball carrying the yarn to make a hanging loop. Fast and easy and so convenient.


In my second box I arranged all my measuring tapes and row counters and some strings :)


All this tidying up and rearranging things in my boxes reminds me of my childhood. As a child I loved to rummage in my mum's two-tier wooden sewing box. It was always full of interesting objects like shiny buttons, round pearl beads, crochet hooks and sparkly embroidery threads. Actually my mum owns this box until today. The only difference is that some of thosebox items, with mum's permission of course, relocated to my boxes :) Like mother, like daughter.

* * *

Woop, woop! Just started my 2 week Easter break and I'm planning 15 blissful days of crafing. Will keep you updated :) Hope you all have a good weekend x

Wednesday, 21 August 2013

Cross Stitched Vintage Rose

Hi all. Today's post is all about roses :) 
This is my recent make - a cross stitched vintage rose designed by a Dutch designer Eline Pellinkhof. Again, it was a freebie kit for Mollie makes magazine. Eline has got a very romantic feminine style of expressing herself and this shows in her books and projects. A bit similar to Tonne Finanger and her Tilda world. Check out Eline's blog for more info and inspiration.

I have recently taken to those lovely vintage rose designs one can see in magazines and I was very happy stitching it. They have sort of folky feel you often can see in Polish folk paintings and fabric patterns and embroidery. 


And now, what my source of inspiration was... Just have a look at those gorgeous florals in the photos (source: internet)


Coming back to Eline again, I envy her this fabulous cross stitch wall painting:


How do you like it? :)))
I loved this cross stitch from the beginning. For a change I stitched it with 3 strands of cotton for a denser and fuller cross effect. I think the ribbon + lace feature is a nice thing too.


Eline's project involves winding strips of fabric around the embroidery hoop. To make it simpler and faster, I painted mine with acrylics mixing red, raspberry and white :) I still have plenty of cotton left, I may stitch it again as a motif for a card sometime. 


Very pleased and enjoy looking at it. It will be a decoration in my bedroom.

*  *  *
Welcome my new followers and visitiors. Thanks for your visits and kind comments you leave behind. Pleasure to read :)

* * *

Would love to share this cross stitched rose with a lovely bunch of crafty people at Hand-made Monday. Do join in this interesting highly social blog hop :)

Saturday, 6 April 2013

Floral Cards (2)

Hi all.
Here are some more of my floral greeting cards made using a card making pack from Let's Get Crafting Magazine. The papers, chipboards and stickers were all co-ordinated in style and colours. I really enjoyed making those cards. I had an opportunity to use some of scrapbooking toys too! :)


Daisies and poppies. This is a card of a big format - A4 size when unfolded  - good for grannies and granddads as you can write your wishes in a very huge font :))))
I really like this card - pleased how the layered card topper turned out with different textures plus the yellow, red and white colours look nice together - cheery and optimistic.


Next, the purple-blue gingham patchwork :) I used some of my extras to add to this card - the doily punch, gingham ribbon and tiny gems.


And another gingham patchwork but in a pink version :) Again, a few extra elements added to the card. I like a bit of a gem sparkle but not too much :)


More floral cards to come soon!  I currently jumped briefly to my cross stitch and been stitching motifs for 3 cute cards :)
Hope you have a good sunny weekend :)

lovely Hand-made Monday blog hop - click here!

Saturday, 15 September 2012

Rose votives

I created these for a craft gift swap with a friend. She loves red roses and here are the two twin tealight votives with rose motif and a long-stemmed glass I added as an extra bit.
The votives have the name "rose" written in different European languages (I always like to add the linguistic bit!)


Saturday, 21 July 2012

Bowl with roses

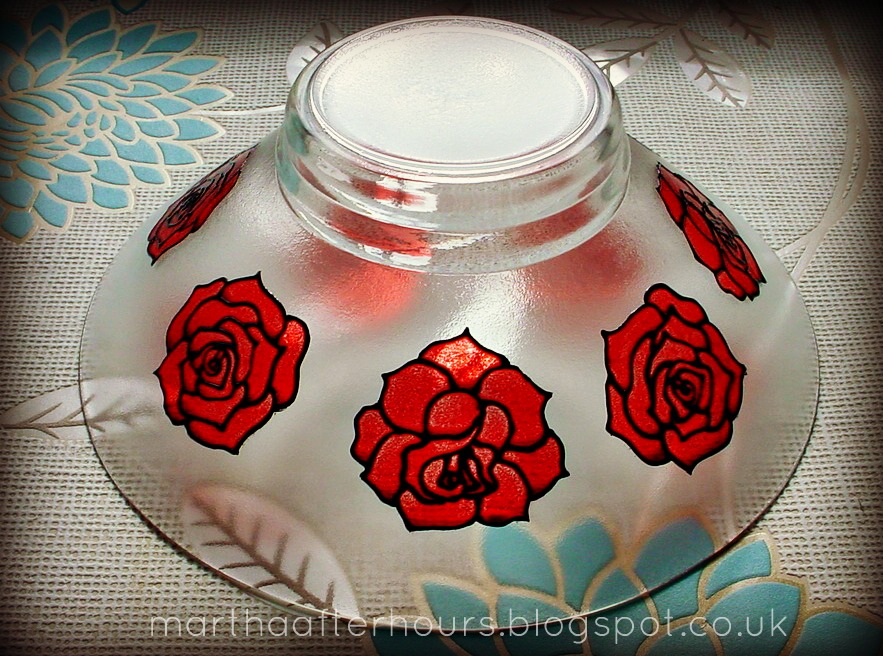
I wondered how I should call this piece of glass? A bowl? Plate? Platter? Whatever it is, it was meant to be painted with some red roses. I deliberately kept this pattern simple - only flower heads, no extra stuff :)


The glass has got sorta rough, frosted texture on the outside and it is smooth inside the bowl. I painted the roses outside the bowl so that any food put in it won't come in contact with the glass paints.


You can see the glass texture still coming through the glass paints. Quite interesting effect, I'd say. Enjoyed painting this one :)

Saturday, 30 June 2012

Birthday Card

Yesterday I made a simple unpretentious card for mom-mom, who was 99 yesterday! What a great age! Bless her!