Pages

Saturday 30 April 2011

Oldies from the past: Window art (1)

Window art largely dominated the initial phase of my glass painting. It was nothing else but painting all sorts of themes with glass paints on a piece of an acetate sheet. It was a good way to practise piping curves and straight lines. After I had finished and the paint had touch-dried, I trimmed the edges of the remaining acetate and placed a vitrail acetate picture on my windows using repositionable sticky dots. No problem if you want to wash your windows :) Simple peel the picture off and replace it when you're done. Simple, isn't it?

The advantage of glass painting on an acetate over painting with real peel-off window art paints, is that your painting on an acetate will never melt on the glass even if exposed to a strong sunlight for a long time, which is exactly what happens to some peel-off window art pictures. They seem to become fragile with time and start cling to the glass so tightly that it's virtually impossible to take them off your window after a while and they tear to pieces. Cleaning windows turns into a nightmare then. Acetate will never let your glass paints come in direct contact with a glass pane hence no danger of paints melting on your windows.
I also recommend this type of glass painting to all glass painting beginners as painting on a flat surface is easier and should come first before painting on glassy curved surfaces. Simply lay down you pattern underneath an acetate, secure it with a masking tape and off you go! Having fun, piping away your relief lines :)

A clear acetate can be obtained in all well-stocked crafts shops or simply try using an OHP foil. Ultimately you can even try laminating some empty laminating pouches and then paint on them! (oh, yes, I have tried that! not ideally clear but will do if you've got no acetate at hand) Acetate comes in different formats: A3, A4, A5 as well as in different thickness.

Below, here is another batch of my acetate window art pictures. They can act as lovely suncatchers as the sun rays shine through them revealing wonderful vitrail colours - so intense and suffused. Et voile! Gorgeous play of colours and sunlight in your house. Feeling cheerful already? :D


Thursday 28 April 2011

Oldies from the past: bottles and decanters

Lots of glass painters like to practise their painting on bottles and jars as they are so widely available. I also did have a go at quite a few of them in the past but I must admit they are not my favourite pieces of glass to paint for some reason. The bottle with the roses went to my mum's (she's using it now as a bottle for her home made liqueurs) and so did the decanter with the orange leaves. The rest was given away or sold at a craft fair :)


Saturday 23 April 2011

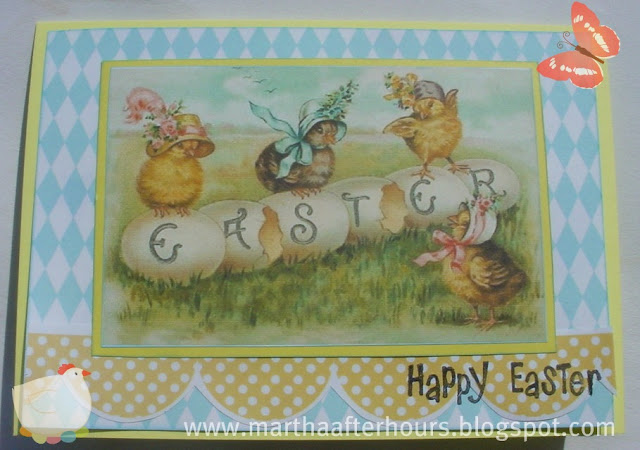
Vintage Easter Cards

Another batch of Easter Cards. This time I chose the vintage style:


 2 Egg-shaped ones, inspired by my friends' cards :


Happy Easter to everyone! Have a lovely break and celebrate in peace.


Friday 22 April 2011

Bunny Bunting


Hey, see my latest creation - Bunny Bunting and my first bunting sewn ever! :) I love all sorts of bunting but this design caught my eye straightaway. To make these I used Dana's tutorial. It's dead easy and a pleasure to make. I thought this cheerful washing line of bunnies would bring some Easter mood into my home :) They are hanging now on the mantelpiece.

Easter time is also a good time for gift swaps with your crafty online mates. This season I have received  a lovely batch of real Easter eggs (including the crocheted hen!) decoupaged by my friend, Agata. Finally I could swap my pseudo-easter eggs  from the beach in Barmouth (yes, yes, they were the round painted stones!) for some proper Polish Easter eggs! They are so real and so lovely! And they are the proper size too -  large blown goose eggs.


Now, see what Kathryn has sent me this Easter - a mother hen and two twin chicks! (chinese kitty included :D)


These lovely tatted easter eggs came all the way from Poland from Orin. All 7!. Each egg is a different design. The photo below shows only 4 examples of how beautiful the tatted lace is.


And finally, also from Poland came these 2 ceramic houses from Ewelina :) plus lots of sweet bits and bobs. I was delighted to see so many lovely treasures.


Thank you girls for all your gifts! x x x

Monday 18 April 2011

Getting organised


Right. Ordnung muss sein! I'm getting my threads organised :) No more tangled strands, split skeins or confused colours. Yesterday I got myself a plastic Anita's Crafts organiser to sort out my loosely stored stranded cotton for my cross stitch projects. I also bought two lots of plastic bobbins but it looks like I'm gonna need many more! I've already spent over 2 hours winding or rewinding my threads and it's just a beginning! It's a big job to get all my stranded cotton sorted out but hey, look, it's getting neater and neater...

Bookmark with 3 bird houses

My latest creation - a cross stitched bookmark with the 3 cute bird houses :) The bookmark was a blog gift swap with Ewelina from Niekiedy blog. I love bird houses in all sorts of shapes and forms so I enjoyed this design a lot! Hope she will like it :)


Sunday 17 April 2011

Gilbert and Matilda

Meet Gilbert and Matilda. Him and Her. From the growing Cheeky Chickens Clan :) Sewn by me as a part of an indoor Easter decoration :) She definitely rules in this relationship, don't you think so? :D

Yellow Chick Cross Stitched Card


Looks like I simply can't break away from the chicks this season. They are the top theme in my cards this Easter. And here is another one! A yellow cutie on a blue-and-green checked background :)

Easter Goose Cross Stitched Card

I stitched this goose for Easter this year and I loved it straightaway. The card has been sent away to my blog friend as a forum gift swap :)


Cross Stitched Congratulation Card

My first cross stitched congratulation card for someone who took a giant step ahead in their career. This card was fun to stitch because of its lovely circus-like font style and a big splash of rainbow colours :) I simply found this design irresistible. I added a cute lilac gingham background to achieve a soft pastel girly style.
The card was bound to impress and it did! :P


Japanese-themed cards

Recently I’ve made 8 oriental-themed cards. They are birthday cards, thank-you cards as well as Mothers’ Day cards. The latter two have already been gone as they were given away on The Mother’s Day :)
I used Japanese-themed papers and chipboards and stamps to achieve this oriental air.


And this is what the whole batch of cards looks like:

Saturday 16 April 2011

Easter Egg Hunt. 6 Scandinavian style cross stitched cards.

I found this lovely series of Scandinavian style cross stitch charts in the April issue of CrossStitcher magazine and I knew straight away I’d stitch them all! I love folky themes so I also added  the gingham background to my stitches. Each egg is a small project that can be stitched quickly and you simply can’t get bored with it!


And this is what the whole collection of my cards looks like...


I’m thinking of stitching some more of them but in my own colours! Easter is just round the corner!

Retirement Card for Brenda

A colleague has retired recently and I thought I’d make a card for her to say “thank you” on the behalf of our school unit :) I wanted to create something leafy and flowery in some soft girly smokey pinks and browns. Hope she liked it :)


Oldies from the past: My glass painting beginnings. How it all began…

I’ve always loved pictures painted on the glass. I can’t tell what exactly attracted me to them, maybe that smooth glassy surface covered with the transparent eye-catching colours contrasting with the uneven texture of the flowing lines, or maybe the intense rainbow colours and their transparency… or maybe all of these things. I loved especially those with some sort of fabulous whimisical dream-like late night scenery, where a thick deep blue inky night of a vitrail paint surrounds the golden-honey stars and moon outlined with a silver contour paste. Everything was so colourful, fairy-tale like, esoteric… The colours were flowing and the lines were curling and swirling all over the glass. I remember that as a child I looked at those pictures as if iI had been hypnotized. I wanted them! I craved them! I wanted to know how to paint them!
I used to see them at the craft shows during the big events in my town. The pictures were painted either by some freelance self-named artists or by the handicapped and sold to raise the money for the local school for the special needs children.
A few years later, as a tutor and student at the same time, I got 2 glass painted gifts from two different pupils. They were a thank-you gift for the whole year of teaching them English. Again, holding  in my hand a piece of mysteriously painted glass, I stared and stared and stared… thinking: what if I tried it myself one day?
Then a new chapter of my life began – moving and living in the UK. February 2008. A new opportunity for developing a brand new hobby arose and the deeply rooted idea of painting on the glass came up to the surface again – I had been taken to a Hobby Craft shop for the first time by my bf. Amazed by the vast craft supplies at that shop, I just couldn’t stop thinking about buying my first few pots of glass paint. And then THE DAY had come! I bought my first glass painting kit – 4 pots of vitrail paint, a tube of outliner, a brush and a pair of glassy votives. I rushed home quickly to see what it feels like to paint on the glass. I fell in love with it! I started and I couldn’t stop… and I still can’t :)
Now, my early works… those days when everything still seemed soooo difficult – piping, outlining, choosing colours and style, smooth even coverage, curvy surfaces, grasping the proportions… Bottles, votives, jars, simple vases – I tried them first, as well as painting on an acetate to get the knack of it.

Below here are a first few examples of my very early works…


I've also painted on an acetate to make transparent window art pictures...


Celestial motifs have always been my favourite! This Sun & Moon Vase was a gift to my bf's mum.


To be continued...